Surface finish is the nature of a surface as defined by the three characteristics of lay, surface roughness, and waviness. The term “surface finish” is not defined correctly and tends to be used interchangeably by product designers and engineers with surface roughness, surface texture and surface topography.
Contents covered in this article
What is a surface finish?
Surface finish refers to the overall description of the surface, including surface texture, surface imperfections, Surface flaws, material add-ons and any coatings.
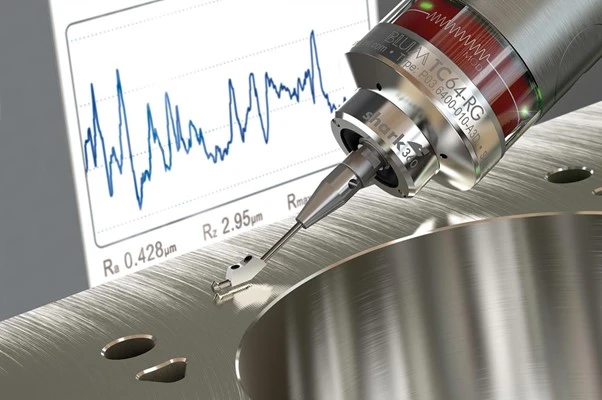
Regarding manufacturing processes such as CNC machining and metal casting, manufacturers typically use a surface finish to refer to the surface texture. Machinist also refers to surface roughness as surface finish.
So what is Surface texture?
Surface texture measures a surface’s overall texture, defined by the surface’s lay, surface roughness, and waviness.
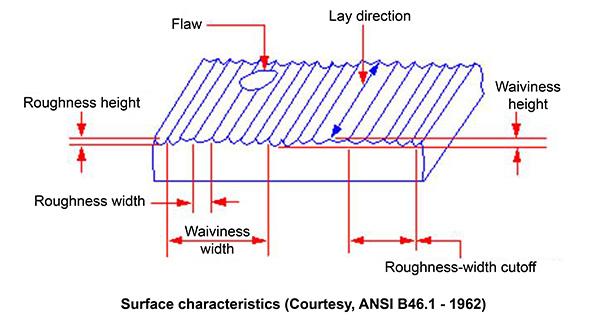
This graphic illustrates how to think about the link between Waviness, Lay, and Roughness:
What is Roughness?
Surface roughness measures the closely spaced irregularities or variations, such as cutting tool marks and grinding wheel grit marks in the surface texture. The deviations are measured from a surface’s ideal flatness or smoothness. It is usually quantified in terms of the average deviation of the surface profile from a mean line or plane.
What is Waviness?
While surface roughness refers to the closely spaced irregularities on the surface, surface waviness refers to the broader undulations or waves that touch can see and feel. Waviness deviation is measured from an ideal surface, repeatedly appearing at longer intervals than the depth.
What is surface lay
Surface Lay is the term used to indicate the direction of the dominant texture pattern on the surface.
What is a flaw?
Surface finish flaws are random irregularities caused during manufacturing, such as dents, tool chattering marks, scratches, holes and cracks.
Surface texture and production time
Depending on the specific manufacturing process used, surface texture and production time can be interrelated in a few ways.
In general, achieving a certain level of surface texture may require additional time and effort during production. For example, if a product requires a highly polished surface, additional steps such as sanding, buffing, or polishing may be necessary to achieve the desired texture. These extra steps can increase the overall production time for the product.
Conversely, specific manufacturing processes may be able to achieve a desired surface texture more quickly than others. For example, injection moulding can often produce parts with a smooth surface finish in a relatively short time compared to other methods, such as machining or casting. But injection moulding initial tooling cost and time will be higher and longer than machining.
It’s important to note that the relationship between surface texture and production time will vary depending on the specific manufacturing process used and the product’s surface texture requirements.
Surface roughness vs. Manufacturing processes
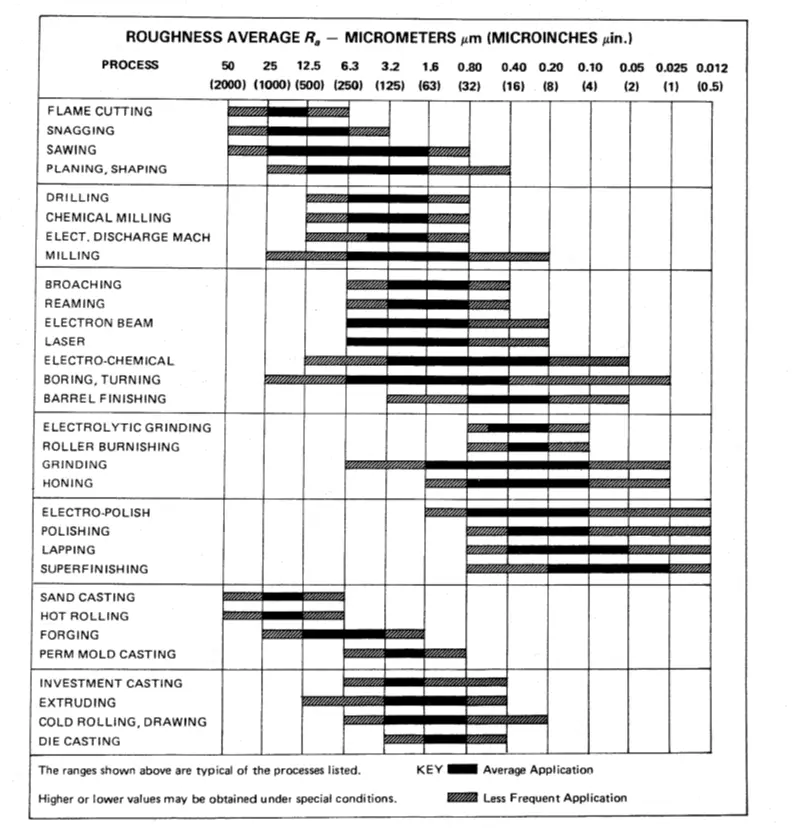
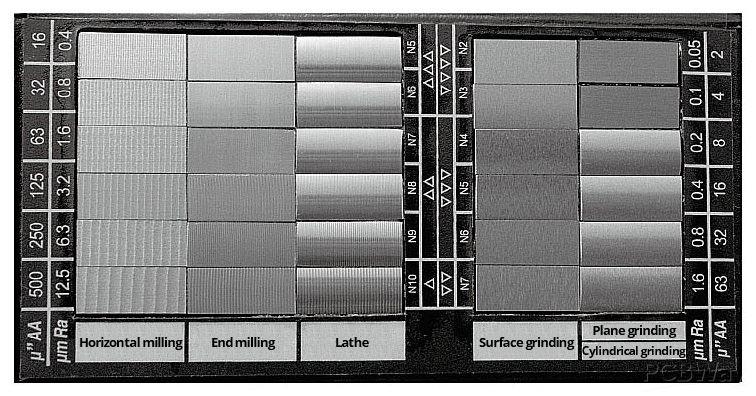
Surface finishes differ greatly depending on the manufacturing procedure used to produce them. A flame-cut plate edge, for example, has a significantly different surface quality than a ground surface. Therefore, the first step in determining how to produce a product that requires a specific finish is to select a method capable of producing the necessary surface finish. More than one process may need to be layered to get the desired output most cost-effectively.
Here’s a table with a chart demonstrating the relative surface roughness of several production processes:
Check how Injection moulding surface finish can be defined and used as a functional or aesthetical feature.
Surface roughness vs. manufacturing cost
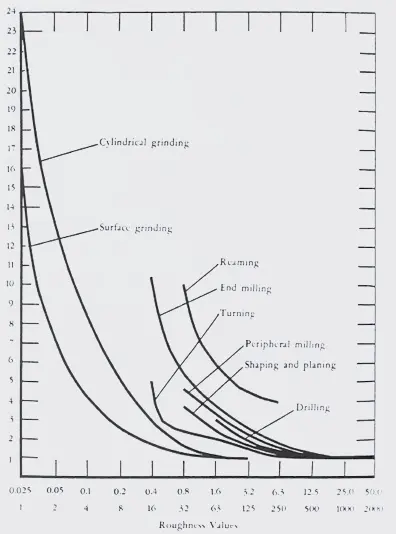
The following graph depicts the approximate link between surface roughness and the cost of obtaining such a finish.
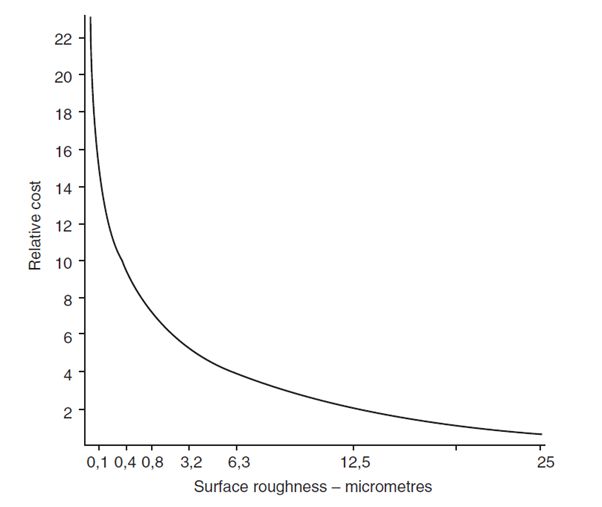
In general, as surface roughness decreases, manufacturing cost tends to increase. A smoother surface generally requires more precise manufacturing processes and tighter tolerances, which can increase the manufacturing cost.
For example, a part that requires a high degree of surface roughness, such as a mirror or lens, may require additional steps in the manufacturing process, such as polishing or grinding, which can be time-consuming and require specialized equipment. This can result in higher manufacturing costs.
However, it’s important to note that the relationship between surface roughness and manufacturing cost can vary depending on the specific manufacturing process and the desired surface texture and roughness. In some cases, a particular manufacturing process may be able to produce a smoother surface more efficiently and at a lower cost than other methods.
For example, rough surface texture on injection moulding parts requires extra EDM processing, while sand casting typically produces a textured finish at no additional cost. Ultimately, the optimal balance between surface roughness and manufacturing cost depends on the specific requirements of the part and the manufacturing process used.
Surface roughness measurement
The R, W, and P profiles are three main categories of surface texture characteristics standardized with the complete symbol.

- R profile – Roughness parameters
- W profile – Waviness parameters
- P profile – Structural parameters
The Ra value is generally used worldwide to capture the above parameters.
Surface roughness standards & equivalents
| Roughness value (Ra) µm | Roughness value (Ra) µin | Roughness grade numbers |
|---|---|---|
| 0.025 | 1 | N1 |
| 0.05 | 2 | N2 |
| 0.1 | 4 | N3 |
| 0.2 | 8 | N4 |
| 0.4 | 16 | N5 |
| 0.8 | 32 | N6 |
| 1.6 | 63 | N7 |
| 3.2 | 125 | N8 |
| 6.3 | 250 | N9 |
| 12.5 | 500 | N10 |
| 25 | 1000 | N11 |
| 50 | 2000 | N12 |
- ANSI B46.1
- BS EN ISO 1302:2002
- ISO 1302:1992 standard defined N grade numbers are not used as they are superseded by BS EN ISO 1302:2002
What are surface finish symbols
Surface finish symbols are graphical callouts to indicate surface texture and surface roughness for design parts manufactured by various manufacturing processes. The surface finish graphical symbol usage is defined in ISO 1302:2002.
So how do you specify surface roughness on a drawing or a specification?
| Description | Graphical Symbol |
| Basic graphical symbol for surface texture |  |
| Expanded graphical symbol indicating removal of material required |  |
| Expanded graphical symbol indicating removal of material not permitted |  |
| Surface texture graphical symbol |  |
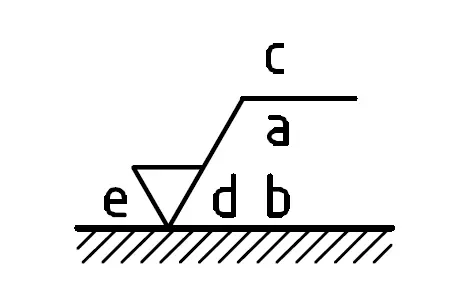
Surface finish callout
| Graphical Symbol | Description |
|---|---|
| a | Single surface texture requirement |
| a & b | Two or more surface texture requirements |
| c | Manufacturing method |
| d | Surface lay and orientation |
| e | Machining allowance |
Indication of the surface lay
The table below indicates the lay and direction of lay about the drawing plane containing the surface texture requirement.
Lay symbol from ANSI/ASME Y14.36 and ISO 1302:2002
| Interpretation and description | Graphical symbol example |
|---|---|
| Parallel to plane of projection of view in which symbol is used | 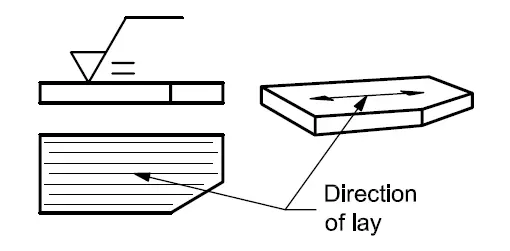 |
| Perpendicular to the plane of projection of view in which the symbol is used | 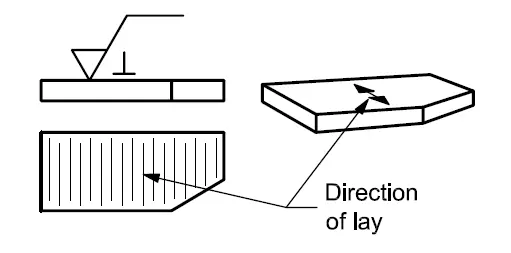 |
| Crossed in two oblique directions relative to the plane of projection of view in which symbol is used | 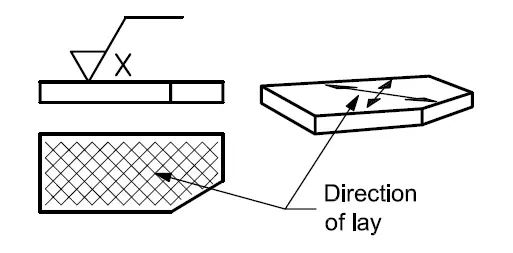 |
| Multi-directional |  |
| Approx. circular relative to centre of surface to which symbol applies |  |
| Approx. radial relative to centre of surface to which symbol applies |  |
| Lay is particulate, non-directional, or protuberant |  |
Why surface texture and roughness is essential?
Surface finish is essential in product design because it can significantly impact the parts’ performance, function, quality and aesthetics.
Here are some reasons why surface roughness and texture are crucial in product design, development and manufacture.
- Aesthetics – Surface texture and the final finish can affect the appearance of the part and the final product. A product’s look and feel are the first things a customer notices. Hence the aesthetic look of any product is as vital as the functional qualities.
- Friction and wear – This article discusses how surface texture affects frictional properties, which can either increase or decrease wear and tear on the part’s material. For example, a smoother surface experiences less friction and less wear, while a rougher surface experience more friction and wear.
- Manufacturing processes – Surface texture and roughness can also affect the choice of manufacturing processes. Depending on the manufacturing process one chooses, certain surface roughness could be very expensive. For example, a smooth surface may be easier to machine or process than a rough surface. Or a metal casting has to be machined to have a smoother surface for features like o-ring grooves or bearing bores.
- Adhesion and coating – The surface roughness also affects its ability to adhere to other materials or coatings. A rough surface provides more surface area for adhesion, while a smoother surface has less surface area and is less effective.
- Functionality and Performance – In some applications, such as in the aerospace industry, surface texture can be critical to the functionality and performance of the material. For example, a rough surface may be necessary to promote bonding between materials or to increase surface area for heat transfer.
Design For Manufacture guide for Surface roughness
- Do not control the surface roughness or characteristics on a drawing or product specification unless it is critical to its functional performance or quality. Needless surface specification increases manufacturing costs.
- As a product designer and engineer, do not specify manufacturing process limitations regarding surface roughness. For example, do not specify CNC machining information such as cutting speed, material removal rate (MRR) and tool type and diameter.
References
Simmons, C. H., Phelps, N., & Maguire, D. E. (2012). Manual of engineering drawing: Technical product specification and documentation to British and international standards. Burlington: Butterworth Heinemann.
