Vacuum casting uses silicon moulds to make a high-quality prototype of plastic and rubber components using two-component polyurethanes resins
Contents covered in this article
What is Vacuum casting?
Vacuum casting, sometimes referred to as Urethane casting or Polyurethane casting uses silicone moulds to make plastic and rubber components under vacuum. It is an extremely adaptable manufacturing process capable of mimicking the injection moulding to produce complex parts in polyurethane resins and cast nylon.
Due to the process being under vacuum, it produces high-quality bubble-free casting with smooth surface texture without any blemishes.
Vacuum casting can be extremely useful in rapid prototyping injection moulding parts and worth considering when selecting rapid prototyping processes for plastic or rubber parts.
Characteristics & applications of vacuum casting
- Vacuum casting is one of the most cost-effective ways to produce high quality, low volume plastic parts which can be similar to injection moulding parts
- The parts are especially suitable for form, fit and function tests during the embodiment design stages, where they can be used for marketing, field user testing and product design verification purposes
- There are many Urethane casting resins commercially available that can be used to create parts to satisfy a wide range of design requirements such as temperature requirements, different surface textures, hardness, etc.
- Materials are also available to create parts that are fully opaque, translucent or completely transparent
- Sometimes high-quality wax masters can be made using vacuum casting for investment casting to increase the finer details of intricate features
Typical technical specification
| Time frame | Within 24 hr – 5 working days for up to 30-50 parts |
| Material choice | Wide variety of materials available |
| Accuracy | ±0.3% (with a lower limit of ± 0.3 mm on dimensions smaller than 100 mm) |
| Minimum wall thickness | To ensure that the mould is filled properly, a wall thickness of at least 0.75 mm is necessary. But best results are achieved with a recommended wall thickness of 1.5 mm |
| Maximum part dimensions | The size of the mould is limited by the dimensions of the vacuum chamber |
| Typical quantities | Up to 50 parts per mould |
| Surface structure | Gloss to Matt surface finish can be obtained |
How does vacuum casting work?
Vacuum casting works in a similar way to traditional injection moulding where it requires a mould tool with a part shaped cavity. Where injection mould tools are made from metal (steel, aluminium etc), vacuum casting uses soft silicone moulds.
Step 1 – Model 3D part
Like most of the manufacturing processes in this modern era, the process begins by 3D modelling the required shape or 3D geometry. As a rule of thumb, products designed for vacuum casting must follow injection moulding design guidelines, to achieve better results. Sometimes, the parts can be inspected using 3D laser scanning which can create and output 3D files.

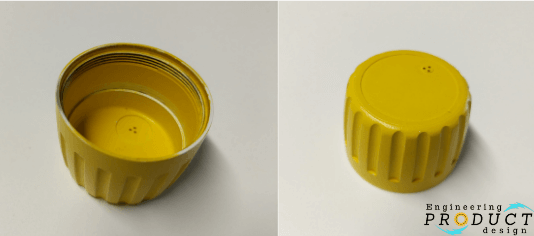
Step 2 – Create a master pattern
The master pattern is then created from the 3D CAD model. Although they were traditionally made using CNC machining or handcrafted, these days it is much quicker to use additive manufacturing. 3D printing techniques such as SLA or SLS are most suitable and cost-effective as the pattern maker.
But, if you have a cast model which can be used as the master pattern then it can be used directly. However, note that the patterns must be able to withstand temperatures up to 40°C.
Sometimes, metal inserts are used to hold tight tolerances in bores and critical areas.
Then, the parts are hand finished manually by cleaning and creating the required surface finish. Surface textures such as gloss and matt can be achieved by painting/spraying the master pattern.
Step 3 – Make silicone rubber mould
Next, a silicone mould is created using the master pattern.
- The Master pattern is fitted with cores, inserts and casting gates and suspended inside the casting box. Risers are put on the part to allow air to escape from the final mould.
- Silicone is then poured around the master under vacuum into the casting box, where it flows around the master pattern filling every single detail.
- Then this is allowed to cure inside the oven at around 40℃ for about 8-16 hours. The time will depend on the size of the silicone mould.
- Once the silicone rubber has cured and dried, the box and risers are removed.
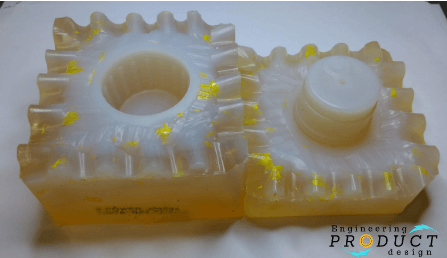
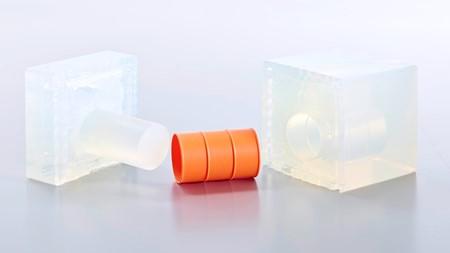
- Finally, the mould is carefully split using a scalpel, exposing the negative shape cavity of the part. The wavy cut ensures accurate alignment of the 2 mould halves during the production process.
- Choosing the right mould-release agent and using it properly is key to avoiding stickiness and surface defects.
Step 4 – Mix and pour Polyurethane resin
Casting polyurethane resins are generally preheated to about 40°C before the mixing stage. A two-component casting resin is then mixed in exact proportions including any coloured pigment and poured into the bowl inside the machine. The mould is then returned and pouring gates are connected to the mixing and pouring bowl.

During the auto pouring process, the casting resins and the colour pigment are fully stirred and deaerated for 50-60 seconds under a vacuum. Then, the resin is poured into the mould under a vacuum to avoid any air pockets or voids. Vacuum ensures bubble-free moulds and removes any resistance to flow caused by pockets of air inside the tool and the filling of the tool takes place by gravity feeding alone.
Step 5 – Demould the cast part
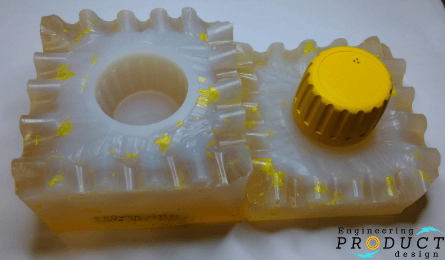
When the resin has been cast, the mould is then placed in a heating chamber to cure. Once cured the casting is removed from the mould. Next, the gate and risers are removed from the casting and any additional finishing is carried out.

The following video illustrates the method of mixing and poring inside Renishaw’s vacuum casting machine.
Video content credit – www.renishaw.com
Advantages and Disadvantages of Vacuum casting
Advantages of vacuum casting
- Multiple components can be used from the master pattern within 24hrs which would reduce the product design prototyping stage cutting time and cost on new product development
- Vacuum casting can be used to create small batches of high-quality injection moulding type parts for prototypes or low volume end-use parts for low stress, relatively benign environments
- A wide range of vacuum casting resins are available to suit various applications such as clear, rubbery, flame retardant, food-grade and coloured to suit
- Resin type can be changed easily without the need to retool to test various material types for a given application or part
- Complex shapes and features can be accommodated by using multi-segment moulds & cores
- Aluminium and brass in-mould inserts can also be used
Disadvantages of vacuum casting
- Since the mould is manufactured using soft silicon, it wears out quickly and generally lasts for about 30 – 50 parts. Tool wear depends on the surface textures, features and size. Bigger parts, rough surface textures and lots of proud features would reduce mould life.
- Similar to injection moulding, irregular, overly thin and thick features may deviate from normal tolerance due to shrinkage.
- 15% – 0.25 % shrinkage rate due to thermal expansion of the liquid and the flexible mould. Generally, the manufacturer would allow and add the shrinkage tolerance but worth talking to them before the order.
- As the surface finish depends on the post-processing of the part, sometimes it is limited to only the outside as it’s difficult to access some internal features of the pattern
- Sharp corners and texts will sometimes have rounded edges
- You will also need plugs and cores for some features
Vacuum casting vs Injection moulding
| Feature | Injection Molding | Vacuum Casting |
| Tooling time | Long (weeks to months) | Short (days to a few weeks) |
| Investment Capital | High (expensive moulds) | Low (affordable silicone moulds) |
| Production Volume | High (thousands to millions) | Low to medium (up to hundreds) |
| Part Size | Typically, small to medium | Small to medium, with some flexibility |
| Material Availability | Extensive range of thermoplastics | Limited to certain resins and polyurethane |
| Cost per Part | Low for high volumes (economies of scale) | Higher per-part cost, especially for low volumes |
| Application | Mass production of plastic parts | Prototyping, low-volume production, complex geometries |
| Design Flexibility | Lower flexibility and requires detailed planning and considerations for mould design | High, suitable for complex and intricate designs |
| Part Complexity | Moderate to high, but with limitations on intricate details due to mould constraints | High, excellent for detailed and complex shapes |
| Surface Finish | Excellent, smooth surfaces with fine details possible | Good, can achieve fine details but may require post-processing |
| Overall Project Time Scale | Long (due to tooling and setup) | Short to medium (quicker setup and adjustments) |
Vacuum casting and Injection moulding are similar processes that can create identical plastic parts using similar materials. However, in contrast to urethane casting, which relies on gravity to fill the moulds, injection moulding employs a pressured nozzle to push the molten plastic into the mould cavity.
The following are the primary factors to consider while picking between urethane casting and injection moulding.
Cost
Initial cost – Because injection moulding uses metal moulds, they are much more costly than urethane casts. Hence injection moulding is better suited for production-grade mass batch manufacturing. On the other hand, urethane casting moulds are cheaper, saving you money upfront. As a result, it is better suited for one-off designs, low-volume productions or pre-production prototypes.
Material cost – The production-grade plastic required for injection moulds is significantly more costly than Urethane. PVC, ABS, acetal, and LPDE are examples of such injection moulding materials. Therefore, Urethane is the preferable material for prototypes and low-volume production.
Per-part cost – The per-part cost for Urethane is usually greater than for injection moulding. This is because each mould can only produce a certain number of pieces. On the other hand, injection moulding produces far larger volumes, making it cheaper. This lowers prior higher expenses, like materials and tools. In this regard, injection moulding is typically the most cost-effective moulding method for long-term manufacturing.
Urethane is suitable for prototypes because of its lower upfront costs and shorter lead times – unless injection moulding is required. For larger product runs, injection moulding provides a considerably greater ROI, and the steel moulds used last significantly longer than their silicone counterparts.
Lead time
Moulds for injection moulding can take a long time to produce because they are made using metal, increasing product development duration. Urethane silicone moulds are easier to produce. They can usually be made with a 3D printer or even by hand, decreasing lead times and allowing you to get your product to market faster.
Volume
Vacuum casting can be utilised for prototypes, bridges, and low-volume manufacturing of one to hundreds of pieces.
Injection moulding can be used for prototypes or bridges, but it is most commonly employed for high-volume manufacturing of hundreds to tens of thousands of units.
Tolerance
Urethane’s tolerance is +/-.010″ for the first inch and +/-.005″ for each inch after that. Likewise, injection moulding tolerances are +/.005″ for the first inch and +/-.002″ for each inch after that.
Recommended reading
- Kalpakjian, S., & Schmid, S. R. (2009). Manufacturing Engineering & Technology (Sixth edition ed.). London: Pearson.